Sage Intacct Construction and Real Estate has many ways to slice and dice data to filter and deliver information in the most effective way to make sense to the end user. One way to do this is by using the ‘Manage Views’ functionality, which appears on most views within Intacct.
Managing Views
Managing Views is used to filter out Sage Intacct displays for transactions; creating a new managed view is often more straightforward and more convenient than creating a new report to access data.
- Tip: Before creating a new report or requesting one to be created by ETHOS Support, it is worth evaluating if a report is necessary or just a Managed View. If the View is good but the information just needs to be added to or better filtered, then a
Managed View is likely the best place to start.
- Trick: The Data presented on a View can be exported into an Excel format just like a report, and often this is actually preferable.
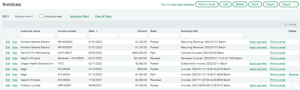
Sage Intacct will save all the views created for later use. These views can be seen in the drop-down option on the left side of the screen. This drop-down will also take on the same name as the currently selected View. In the example below, “Recently Modified” View was selected. The data was filtered to meet the parameters of the View, so the left-hand drop-down took on the name Recently Modified.
Creating and Editing Custom Views
You can create and edit existing custom views by selecting Manage Views near the top left of the screen. From there, select the Create New View screen.
Create New View consists of five separate screens to create and save a new view to use.
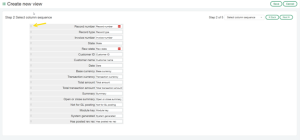
The first screen allows you to select the columns that will appear in the new View
This screen is probably the most important and also shows which data columns the system selects by default. Here, you choose all the data to display on the new View.
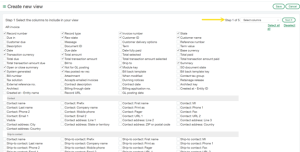
- Trick: When you create a new view, this screen shows all the data points related to the specific transaction. Use it to quickly see what kind of data you can use to create a report or generate a print document template from the same transaction or dimension type.
- Tip: Use the next three screens to filter, sort, and organize the columns and their data that you select on this screen. It is not uncommon to skip these next few screens and leave the default values.
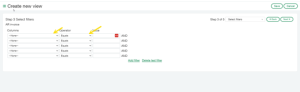
The second screen in the process lets users select the sequence of columns that will appear from left to right on the view
Users can reorder them by dragging the symbol shown in the following image and dropping it into the preferred position.
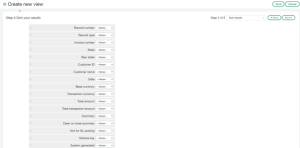
On the third screen in Create New View, you can further filter the data using a variety of functions.
After selecting the data on the first screen, you can narrow it down even more. This can be useful to only display data over a certain value or from a certain date on the view.
- These filters apply automatically each time you use the view. Unlike a filter prompt, they don’t ask for input every time. You can adjust only the selected settings by editing the entire view; you can’t change them directly after creating the view.
The fourth screen in Create New View sets the view of the data to default ascending or descending.
You can also rearrange the data like on the second screen.
Finally, is the fifth screen to set a name for the View and a description.
Once determined, click save, and the new View is ready to use.

- Tip: You don’t have to follow a specific naming convention for your Views, but you should give them clear, descriptive names so others can easily identify and use them in the future.
Contact us for more information and a demo of Sage Intacct Construction & Real Estate here >>>