
Tips and Tricks to setting up ACH Payments in Sage Intacct
More vendors are switching over to ACH Processing to quickly receive money. If you are currently migrating to Sage Intacct or want to set up ACH, ETHOSystems has put together a video for our client here >>>. In the meantime, here are some of the top Tips and Tricks for setting up ACH in Sage Intacct.
What is ACH?
ACH Stands for Automated Clearing House. The network and set of standards allow consumers and businesses to process financial transactions electronically. Many people also refer to it as Direct Deposit, Electronic Payment, or Online Bill Pay.

Step 1:
Contact your bank and get their ACH Payment Specification Sheet. Each bank has a few different standards so getting this is extremely important.
Step 2:
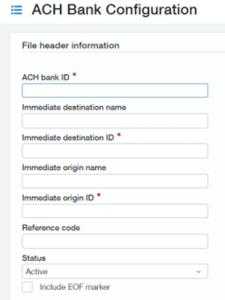
Make sure you get the following information:
- ACH Bank ID – A unique identifier for your Bank.
- Immediate Destination Name – The name of your bank. Note: This can sometimes be different from what you know the bank as, so make sure they provide this.
- Immediate Destination ID – Your Bank’s Routing Number.
- Immediate Origin Name – Your Company Name, usually provided by the Bank.
- Immediate Origin ID – Your 10 Digit Company Number provided by the Bank.
- Reference Code – The bank provides the Reference Code, although sometimes users leave it blank.
- Include EOF (End of File) Marker – Enable this if your bank expects a carriage return at the end of the ACH Payment File.
Step 3:
Fill out the ACH Bank Configuration within Sage Intacct. You can find this in the Cash Management Module under the Setup Tab.
Step 4:
Configure each Checking Account in Sage Intacct, by going to the Bank File Tab and “Enable ACH Payments”
- NOTE: Selecting the ACH Bank ID automatically fills in the required fields.
- NOTE: This is only for Checking Accounts, NOT Savings Accounts.

Step 5:
Configure each Vendor for ACH Payments in Sage Intacct.
- Under the Payment Information tab, Set the “Preferred Payment Method” to ACH / Bank File.
- Under the Bank File Tab, “Enable ACH Payments” and enter the Routing Number, Account Number, Account Type, and Account Classification.
- There are 3 options for Account Classification
- Business (CTX) or (CCD) are for Business-to-Business Transactions
- Personal (PPD) is for paying individual contractors
- NOTE: You can import this information to update multiple vendors at once.


Step 6:
Generate a TEST file
- It is recommended that you send a test ACH File to your bank.
- Sage Intacct will create the file you send to your bank. NOTE: It will not send the file to the bank for you.
- The ACH File should only be opened in Notepad to prevent losing any formatting.

If you have any questions regarding Sage Intacct Construction, please contact us here at ETHOSystems!
![]()